
Self-deployment Tutorial 1 (Direct Deployment)
If you find public nodes less than satisfactory, why not try deploying your own personal server node.
Prerequisites: A server (computer) with an accessible public IP port. EasyTier has very low resource overhead and hardly affects normal server operation.
Deploying with a GUI (using QtEasyTier)
Section titled “Deploying with a GUI (using QtEasyTier)”As mentioned earlier, EasyTier does not distinguish between server and client. Therefore, on a server with a graphical interface, you can directly use QtEasyTier to deploy an EasyTier server.
Setting Up the Server Instance
Section titled “Setting Up the Server Instance”Create a new instance configuration. In the basic settings, fill in the hostname, network name, and secret. If you want this server to act as a pure “network access point” and do not need to access services on this device, you can disable DHCP and leave the virtual IPv4 address empty, so that no IP address is assigned to this server. If you also want to manage this device through the QtEasyTier virtual network, you can keep DHCP enabled or assign a fixed virtual IP (recommended).
If you only plan to use this server for your own virtual networking, enable private mode. If you want to use it as a public server or share it with others, turn off this switch so that the instance can forward traffic from devices with different network names and secrets.
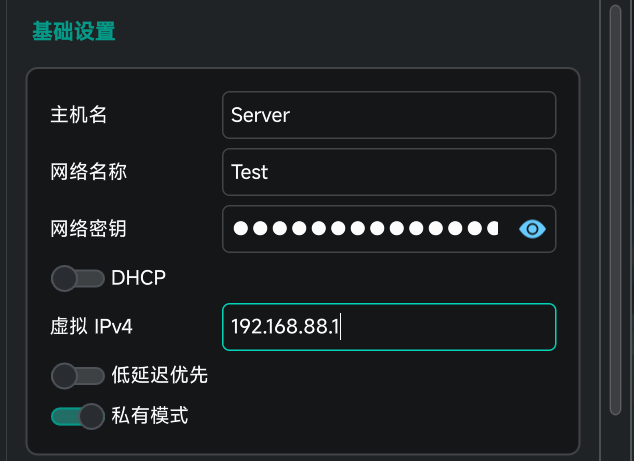
Setting the Listening Address and Port
Section titled “Setting the Listening Address and Port”Switch to the advanced settings page. In the Network Services section, there is a “Listen Address” setting. Click “Add Listen Address” and fill it in the following format to confirm.
protocol://0.0.0.0:portThe protocol can be
tcp,udp,ws(WebSocket),wss(WebSocket over TLS), orwg(WireGuard). Choose based on your actual situation. If you don’t know which to choose, using tcp and udp is fine.
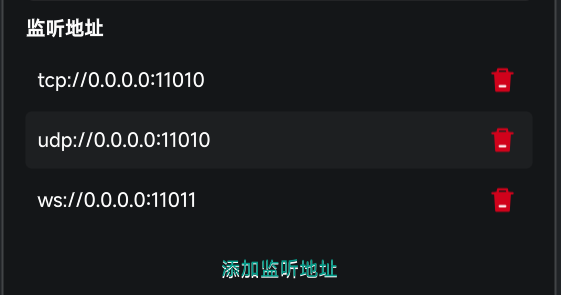
You can add multiple protocols and ports so that the server can be reached through multiple methods, improving connection stability.
After all the above settings are configured, click “Start Running” to run the “server” node. Others can connect to this node using the server’s public IP + port.
Deploying on Linux Without a GUI (using easytier-core)
Section titled “Deploying on Linux Without a GUI (using easytier-core)”The method described here deploys by directly downloading EasyTier’s official binary and using a configuration file.
This section uses Ubuntu 24.04.3 LTS as an example.
Downloading the EasyTier CLI (easytier-core)
Section titled “Downloading the EasyTier CLI (easytier-core)”In the text below,
*represents an arbitrary filename, and**represents a different arbitrary filename.
1. One-click install script
Section titled “1. One-click install script”1.1. EasyTier Community Edition install script — maintained by 凉城听暖
wget -O /tmp/installer.sh "https://gitee.com/zyflypzlc/warehouse/raw/master/easytier_installer/installer.sh" && sudo bash /tmp/installer.shAfter installing with the community edition script, the config file does not include public servers. Please add them manually if needed.
1.2. EasyTier Official Script (currently only supports installing 2.4.5)
Note: The official one-click script requires unzip to be installed first.
# Install unzipsudo apt update && sudo apt install unzip# One-click install scriptwget -O /tmp/easytier.sh "https://raw.githubusercontent.com/EasyTier/EasyTier/main/script/install.sh" && sudo bash /tmp/easytier.sh install --gh-proxy https://ghfast.top/1.3. After Script Execution
After the script completes successfully, the EasyTier binaries will be installed in /opt/easytier, with configuration files located at /opt/easytier/config/*.conf.
EasyTier will be registered as a system service, which can be managed with the following commands:
systemctl start easytier # Startsystemctl stop easytier # Stopsystemctl status easytier # Check statussystemctl restart easytier # RestartThe official script’s management commands require replacing
easytierwitheasytier@config-filenameIt is not recommended to manually change the GitHub acceleration link in the one-click install script!
If the install script fails and you retry, delete the/opt/easytierfolder first!
2. Manually Downloading the CLI
Section titled “2. Manually Downloading the CLI”- Download the appropriate easytier CLI version for your hardware architecture from the EasyTier download page.
For example, for a 64-bit AMD/Intel processor, choose
easytier-linux-x86_64-v2.x.x.zip.
- (Optional) Prefix the GitHub acceleration URL: https://gh-proxy.org/ to the easytier download link to form an accelerated download link and complete the download:
https://gh-proxy.org/https://github.com/EasyTier/EasyTier/releases/download/v2.6.4/easytier-linux-x86_64-v2.6.4.zipYou can also use curl to download:
# Install curl (Debian/Ubuntu)sudo apt update && sudo apt install curl# Download easytier archive to /tmpcurl -L https://gh-proxy.org/https://github.com/EasyTier/EasyTier/releases/download/v2.6.4/easytier-linux-x86_64-v2.6.4.zip -o /tmp/easytier_tmp_install.zip- Extract the archive and move the binary to
/opt/easytier
# Install unzipsudo apt update && sudo apt install unzip# Extract to /opt/easytierunzip -o /tmp/easytier_tmp_install.zip -d /opt/easytier# Move binary files to /opt/easytiermv /opt/easytier/easytier-linux-x86_64/* /opt/easytier/- (Optional) Create the config directory and remove the empty folder
mkdir /opt/easytier/configrm -rf /opt/easytier/easytier-linux-x86_64/- Set execution permissions
sudo chmod +x /opt/easytier/easytier-core /opt/easytier/easytier-cli- Use the following command to check the easytier core version. If it displays, the installation was successful.
/opt/easytier/easytier-core --version- (Optional) Install Shell Auto-Completion
# Fish auto-completion easytier-core --gen-autocomplete fish > ~/.config/fish/completions/easytier-core.fish easytier-cli gen-autocomplete fish > ~/.config/fish/completions/easytier-core.fishGenerating a Configuration File
Section titled “Generating a Configuration File”Next, write a TOML configuration file according to the EasyTier configuration file format.
- For ET installed via the one-click script, you can directly modify the
/opt/easytier/config/*.confconfig file. - For manually downloaded ET, choose a directory to store the config file, preferably near the easytier-core binary.
The configuration file can be generated using the Config File Generator.
- Here is an example config file:
hostname = "MingYueQingFeng"   # Node name, customizabledhcp = falselisteners = [    "tcp://0.0.0.0:11010",    "udp://0.0.0.0:11010",] # Listening ports, customizable
[network_identity]network_name = "your-network-name"network_secret = "your-network-key"
[flags]latency_first = true   # Low-latency modeprivate_mode = true    # Private mode
Starting the EasyTier Node
Section titled “Starting the EasyTier Node”For ET installed via the one-click script, use the following commands directly to start the EasyTier node:
systemctl start easytier # Community Editionsystemctl start easytier@default # Official EditionFor ET using a custom **.conf config file, use the following commands to start the EasyTier node:
# Stop the node running with the default configsystemctl disable easytier@* && systemctl stop easytier@*# Enable and start the node with the custom config filesystemctl enable easytier@** && systemctl start easytier@**For manually installed core, use the following command to start the EasyTier node:
./easytier-core -c /path/to/your/config.toml# Launch with multiple config files./easytier-core -c /path/to/your/config1.toml -c /path/to/your/config2.tomlWhen launching with multiple config files, each config’s listening port and RPC port must use different ports from other simultaneously launched configs!
However, once you close the terminal, EasyTier will be killed. Therefore, we need to register it as a system service so it can keep running.
This example uses a Linux system with systemctl.
- Create a systemd service file
sudo nano /etc/systemd/system/easytier.service- Edit the service file
[Unit]Description=EasyTier Service# Ensure the network is fully online before startingAfter=network.target network-online.target syslog.target# Explicitly require network onlineWants=network.target network-online.target
[Service]Type=simpleExecStart=/path/to/your/easytier-core -c /path/to/your/config.tomlRestart=alwaysRestartSec=3sStartLimitIntervalSec=0
[Install]WantedBy=multi-user.target- Set permissions and load the service
- Save and exit the editor, then run the following to reload systemd service configuration:
sudo systemctl daemon-reload- Enable the service to start automatically on boot:
sudo systemctl enable easytier- Start the service:
sudo systemctl start easytier- You can check service status and logs with:
systemctl status easytierjournalctl -u easytierAt this point, if nothing goes wrong, the EasyTier server node should have started successfully.